In iOS 15, Apple introduced a new Focus feature that lets you create several profiles or Focus modes helping you better manage relevant notifications. By default, you have a few Focus profiles like Do Not Disturb, Personal, Sleep, Work, and Driving. You are free to create more or delete all except Do Not Disturb.
In this brief guide, let me tell you everything about this and how to filter notifications using Focus in iOS 15. By the end of this post, you will have learned how to prioritize notifications and not get bothered by unnecessary ones during important times.
How to configure iOS 15 Focus according to your needs
Where is my Do Not Disturb!
First things first, you may wonder what happened to my good old Do Not Disturb option in the Settings app! There is nothing to worry about as this option is still there, but now as a sub-option inside Focus.
To access DND options, open the iPhone Settings app → Focus → Do Not Disturb. From here, you can customize it just like other Focus profiles (explained below). From the bottom, you may also have it turn on automatically by enabling Smart Activation or setting the desired period. Or, tap the crescent moon icon in the Control Center.
The standard notion is that Do Not Disturb silences all iPhone rings, messages, and app notifications (unless you have allowed any specific people or apps).
How to configure Personal, Sleep, Work, and other Focus modes
Suppose you are in your office from 10 AM to 5 PM, where you do not want any unnecessary app notifications, calls, or messages. During this, you may not like anyone else calling you except your kids, wife, and a few office colleagues.
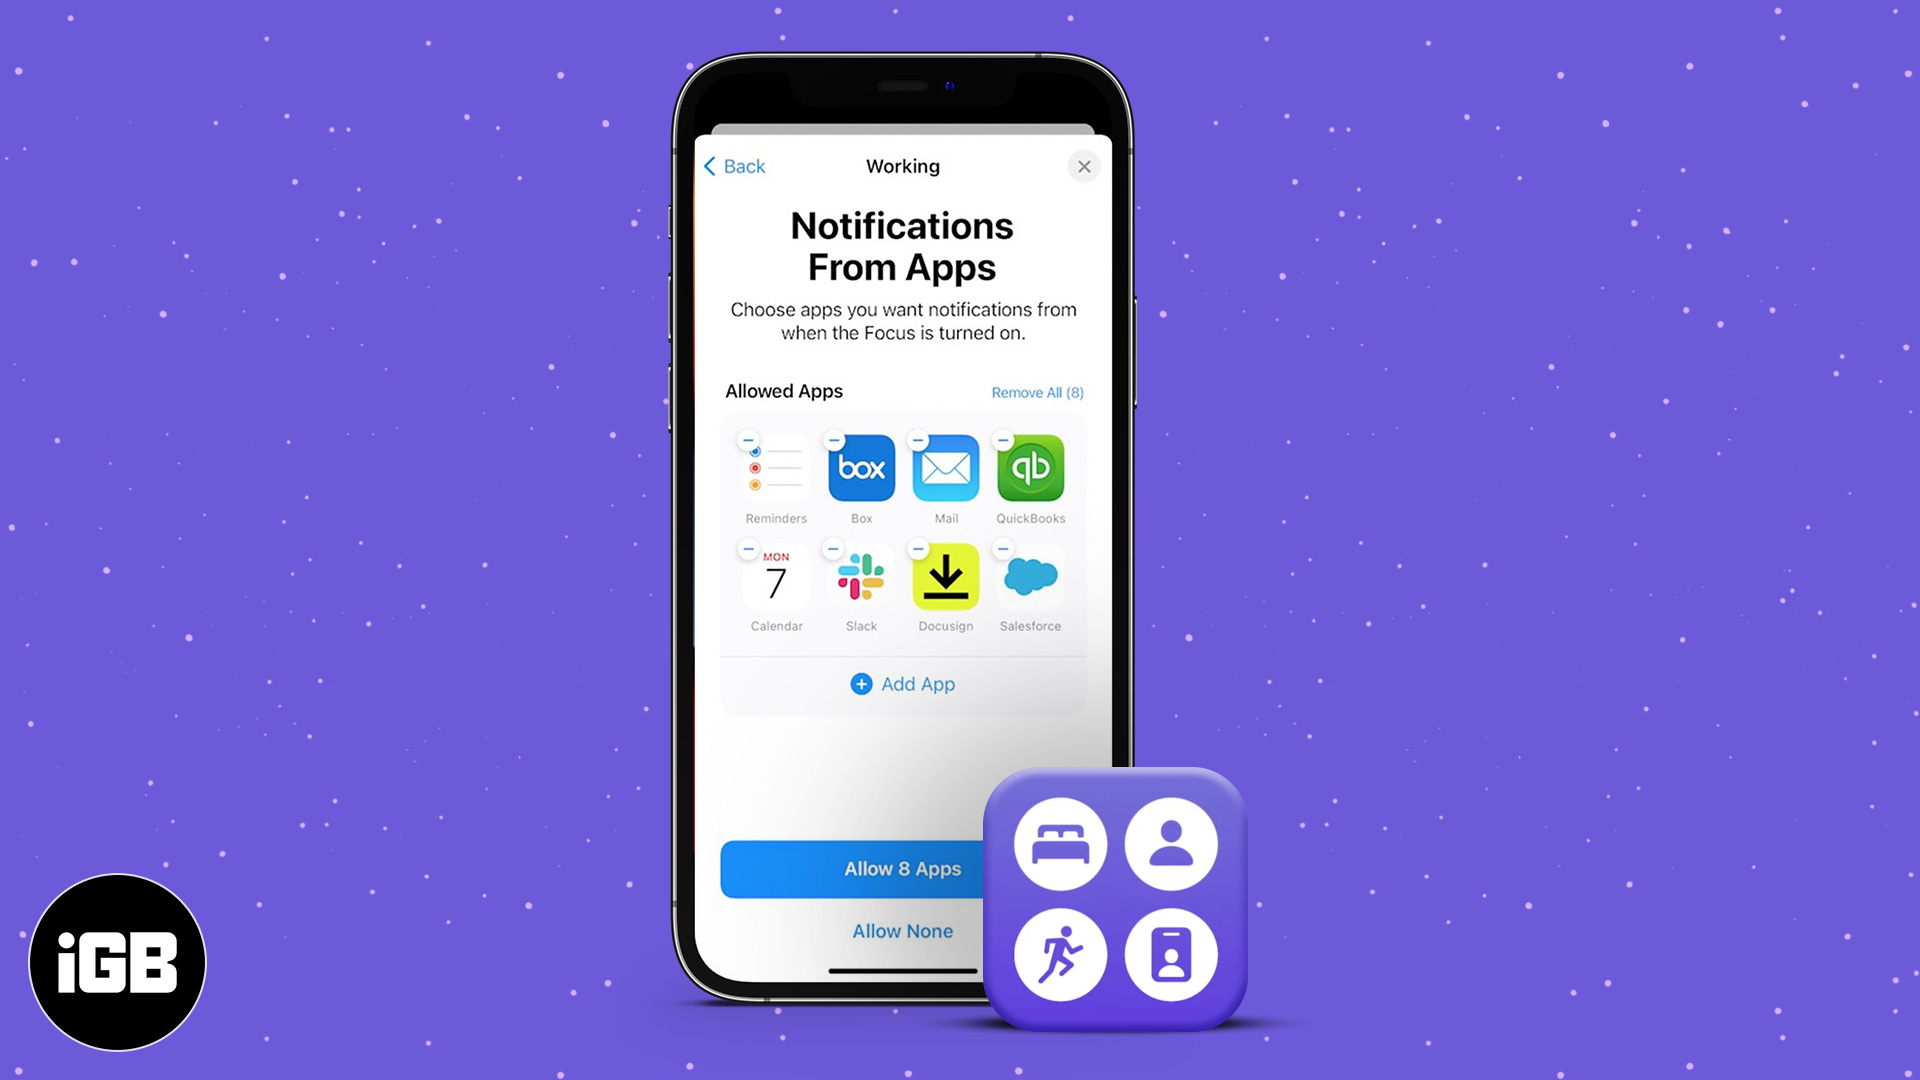
Similarly, you may not want to get disturbed by notifications from gaming, messaging, or offer apps during the office. But you most certainly would like notifications from work apps like Calendar, Slack, or Gmail. Focus lets you configure exactly this so that you are not disturbed unnecessarily and can ‘focus’ on things that matter. Let me show you how.
- Open iPhone Settings and tap Focus.
- Tap Work. If you wish to customize any other option, like Sleep or Personal, tap that.
- Tap People > from the top left.
- Tap Add Contact, select the desired contacts and tap Done. These are the people who can still call and message you when Focus is enabled. Notifications from these people will be delivered as usual.
- Next, tap Apps → Add App to permit apps that can send you notifications when Focus is enabled.
Done. You have successfully configured people and app notifications for Work Focus.
Focus syncs via iCloud to all your Apple devices, ensuring you do not have to configure these on all devices separately. Pretty nice!
Now, let us talk about the Focus options
Next, take a minute to explore the additional options here. For example, you may enable Time Sensitive Notifications that are essential, not-worth-missing notifications. For example, the Health app reminding you to take your medicine. These notifications break the Focus barriers and are delivered to get your attention.
Share Focus Status, if enabled, lets the apps know that you have silenced notifications at the moment. For example, when Focus is on, your friend messaging you on iMessage will see a notice informing them that you have chosen to silence your notifications temporarily.
Next, you have some customizations options allowing you to show only the selected Home screen page when Focus is enabled. By tapping Options, you may also choose to dim the lock screen, hide the red app notification badge, and use delayed notifications.
Above, we learned how to customize Focus. Now, let us learn how to enable a Focus profile and put it to use.
How to Enable Focus on iPhone in iOS 15
Method I: Smart Activation
- Open iPhone Settings and tap Focus.
- Tap Work or the option you are interested in.
- Scroll to the bottom, tap Smart Activation and enable it.
- From now, your iPhone will automatically turn on this Focus mode based on your location, app usages, etc. For example, if it detects that you have reached your office, it will automatically enable Work Focus.
Method II: Automatic Activation
- Open iPhone Settings and tap Focus.
- Tap Work or the option you are interested in.
- Scroll to the bottom and tap the tiny blue plus icon.
- Choose Time, Location, or App. I want to use Work Focus from 9 AM to 6 PM on Monday to Saturday. Thus, I am choosing Time.
- Set the From and To time and choose the repeat days.
- Finally, tap Done.
Method III: Manual Activation
- Bring up the iPhone Control Center. On iPhone with Face ID, swipe down from the top right, where the battery icon is. On iPhone with a from Home button, swipe up from the bottom of the screen.
- Tap the word Focus. (If you tap the crescent moon icon, it enables Do Not Disturb.)
- Tap to enable Work or any other desired option.
- You may tap the three dots icon to enable it for an hour, until evening, etc.
The steps to turn Focus off are similar.
How to create a new Focus option
As mentioned already, when you update to iOS 15, you have a few pre-built Focus modes. But if you like, you can create a new one – say Vacation. After creating, you can customize it and have desired people and apps send you notifications when this custom Focus is enabled.
- Open the iPhone Settings app and tap Focus.
- Tap the plus icon (+) from the top right and choose Custom.
- Give it a unique name, set a color, and choose the desired glyph. Once done, tap Next.
- Depending on your preferences, tap Add Contact or Allow None. Do the same for apps.
- Choose if you would like to enable Time Sensitive Notifications or not.
Done! You have successfully created your custom Focus mode. You can edit and enable it like any other Focus mode.
No longer need a Focus profile? From the bottom tap, Delete Focus.
Wrapping up!
This is how you can filter notifications with Focus on iPhone in iOS 15. I hope this guide was helpful, and now you can customize, configure, create, enable, and delete Focus on your iPhone to have a “focused” and productive time.
Author Bio:
Ankur Thakur has been an Apple user for over seven years now. At iGeeksBlog, I love creating how-tos and troubleshooting guides that help people do more with their iPhone, iPad, Mac, AirPods, and Apple Watch. I like to watch stand-up comedy videos, tech documentaries, news debates, and political speeches in my free time.