The two popular web development frameworks i.e., .NET and .NET Core are strongly known for their security features. Because of this reason, so many companies go with .NET for their web developments. Some of these features include HTTPS enforcement, CORS management, authentication-authorization management, error management with Global Exception Handling support in ASP.NET Core, etc.
In .NET Framework and .NET Core, the FluentMigrator is a database migration framework. In this blog, we will create a new Web API application in ASP.Net Core. These are the following steps to create a new application in ASP.NET Core.
- In Visual Studio 2019, and you will have to create a new Project
- Then, you have to select ASP.NET Core Web application and click on the Next button.
- After giving the name to the project, click on the Create button, then select the API template option and click on the Create button.
Adding the NuGet Package
If your project is ready you can add the NuGet package to the newly created project. You can right-click on your project and select the option Manage NuGet Packages.
It will open the NuGet Package manage window. You will go to the browse tab in the NuGet package manager window, you will search for FluentMigrator.Runner NuGet package.
You can install the latest version 3.2.10 of FluentMigrator.Runner NuGet package into the project. You can’t separately install the FluentMigrator NuGet Package because of the FluentMigrator.Runner NuGet package has a dependency on the core FluentMigrator NuGet package.
It is also has a dependency on FluentMigrator.Runner.SqlServer NuGet package. The FluentMigrator.Runner.SqlServer is used for the database.
Creating the Database
We want to clinch that if the entire process is automated in Visual Studio 2019, the database creation is also will be automated. You can’t create a database in the FluentMigrator.
In Visual Studio 2019, you will build your own implementation for database creation. It will create a simple class to check if the database exists on the server or not.
Database Class
Before we start the coding, first of all, we will create a new folder and give it a name Migrations. We will work on all the database migration-related classes inside of this folder.
You will create a new static class FluentDatabase inside the Migrations folder. And this FluentDatabase class will have a single method DatabaseData.
The DatabaseData method will accept two string input parameters.
- The first parameter is used for the connection string to the master database on the server.
- The second parameter is used for the name of the database FluentDemo to create if it does not exist.
The DatabaseData method is very simple for implementation using SQL query. First of all, we check if the database exists in the sys.databases table. If the database does not exist we will create the database.
We will use Dapper for executing SQL queries.
Add the Dapper NuGet Package
You can right-click on your project and select the option Manage NuGet Packages. You can search for Dapper in the Browse tab.
You can install the latest version 2.0.78 of the Dapper NuGet package.
Code to Create Database
We will do the code for creating a new database inside the DatabaseData method.
Example
using System.Linq;
using Dapper;
using System.Data.SqlClient;
namespace demoOfFluentMigrator.Migrations
{
public static class FluentDatabase
{
public static void DatabaseData (string connectionString, string name)
{
var parameter = new DynamicParameters();
parameter.Add(“name”, name);
using var con = new SqlConnection(connectionString);
var record = con.Query(“SELECT * from sys.databases Where name= @name”,parameter);
if(!record.Any())
{
con.Execute($”CREATE DATABASE {name}”);
}
}
}
}
Create Tables using FluentMigrator
We will create migration classes like Migration_yyyyMMddHHmmss.cs. It also helps to sort the files in Visual Studio from the earliest to the latest.
We will create a Product table, it will contain information about a Product, this table has only five columns.
- ProdId is an auto-generated identity column and primary key.
- ProdName describes the name of the product.
- ProdCategory describes the category of the product.
- Quantity describes the quantity of the product.
- Price describes the price of the product.
We will create a new class Migration_20210106152700.
Implementation of Migration_20210106152700
It is derived from the abstract Migration base class of FluentMigrator. You will also add the attribute Migration to the class. We will pass the same number 20210106152700 in the Migration attribute.
Two abstract methods Up and Down in the Migration base class will implement inside the Migration_20210106152700 class.
The Up () method provides the Create table and The Down () method provides the Delete table.
Example
using FluentMigrator;
using FluentMigrator.SqlServer;
namespace demoOfFluentMigrator
{
[Migration(20210106152700)]
public class Migration_20210106152700 : Migration
{
public override void Down()
{
Delete.Table(“Product”);
}
public override void Up()
{
Create.Table(“Product”)
.WithColumn(“ProdId”).AsInt32().NotNullable().PrimaryKey().Identity(1, 1)
.WithColumn(“ProdName”).AsString().NotNullable()
.WithColumn(“ProdCategory”).AsString().NotNullable()
.WithColumn(“Quantity”).AsInt32().NotNullable()
.WithColumn(“Price”).AsInt32().NotNullable();
}
}
}
Update StartUp for FluentMigrator
Both classes are ready for database creation and table migration. The FluentMigrator add in the StartUp class.
Update ConfigureServices
You can add the FluentMigrator dependency injection in the ConfigureServices method in the StartUp class.
You can call AddLogging to add console logging for FluentMigrator so we can see the SQL statements executed by FluentMigrator. You can use the ILoggingBuilder Action of the AddLogging method and call the AddFluentMigratorConsole on the ILoggingBuilder instance.
We will use ConfigureRunner to configure the migration runner.
- You can call AddSqlServer to add the SQL Server 2016 support.
- In the WithGlobalConnectionString method, you can pass the connection string to the database.
- You can call the ScanIn method to provide the assembly where the migration classes are available. You can pass Assembly.GetExecutingAssembly() method in the ScanIn method.
Example
public void ConfigureServices(IServiceCollection services)
{
services.AddControllers();
services
.AddLogging(F => F.AddFluentMigratorConsole())
.AddFluentMigratorCore()
.ConfigureRunner(F => F
.AddSqlServer2016()
.WithGlobalConnectionString(“Persist Security Info = False; Integrated Security = true; Initial Catalog = FluentDemo; Data Source = (localdb)\\MSSQLLocalDB “)
.ScanIn(Assembly.GetExecutingAssembly()).For.All());
}
IApplicationBuilder Migration Runner Extension Method
You will create a new static class ExtensionMigration inside of the Migration folder for running the actual migration. It has a single extension method Migrate on IApplicationBuilder.
First of all, we create an instance of IServiceScope by calling the CreateScope method on the ApplicationServices property of the IApplicationBuilder instance in the Migrate method.
You can call the ListMigration method on the IMigrationRunner, it lists out all the eligible migrations in the solution. This method will print out the eligible migrations.
You can call the MigrateUp method on the IMigrationRunner instance to create the table in the database.
Example
using FluentMigrator.Runner;
using Microsoft.AspNetCore.Builder;
using Microsoft.Extensions.DependencyInjection;
namespace demoOfFluentMigrator.Migrations
{
public static class ExtensionMigration
{
public static IApplicationBuilder Migrate(this IApplicationBuilder app)
{
using var data = app.ApplicationServices.CreateScope();
var FlRunner = data.ServiceProvider.GetService<IMigrationRunner>();
FlRunner.ListMigrations();
FlRunner.MigrateUp(20210106152700);
return app;
}
}
}
Update Configure
We will perform two operations in the Configure method of the Startup class. We can call the DatabaseData of the FluentDatabase class, if the database is not available, create it.
We will call the extension method to Migrate from the IApplicationBuilder instance.
Example
public void Configure(IApplicationBuilder app, IWebHostEnvironment env)
{
if (env.IsDevelopment())
{
app.UseDeveloperExceptionPage();
}
app.UseHttpsRedirection();
app.UseRouting();
app.UseAuthorization();
app.UseEndpoints(endpoints =>
{
endpoints.MapControllers();
});
FluentDatabase.DatabaseData(“Persist Security Info = False; Integrated Security = true; Initial Catalog = Fluen; Data Source = (localdb)\\MSSQLLocalDB “, “FluentDemo”);
app.Migrate();
}
Output
First of all, we refresh the database, we can see the Product table is created with all columns
We can also see the VersionInfo database crated by FluentMigrator for keeping a track of all the migrations.
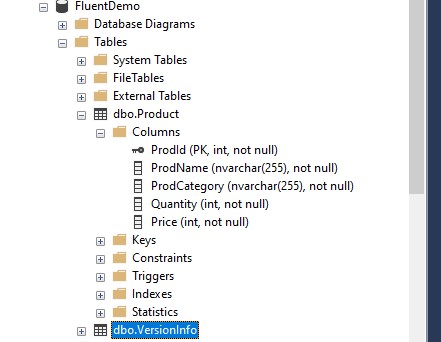
Figure: Output of FluentMigrator
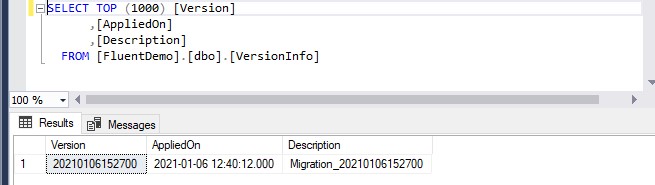
We have to run the query of the VersionInfo database and we can see the version with 20210106152700 and also add class name in the table.
Figure: Output of VersionInfo
Conclusion
The FluentMigrator is really easy to use for the developer compared to EntityFrameWorkCore. If you don’t have any idea about the API documentation, you can build the application even without any help using this.
Author Bio:
Ajay Patel – Technical Director, iFour Technolab USA. Inc.
A Seasoned technocrat with years of experience building technical solutions for various industries using Microsoft technologies. With sharp understanding and technical acumen, have delivered hundreds of Web, Cloud, Desktop and Mobile solutions and is heading the technical department at ASP.NET Core Software Company – iFour Technolab USA. Inc.