Did you know that 72% of online shoppers say product descriptions are a key factor in their purchase decision? And that nearly 45% of the buyers depend on product images to represent the items they’re considering? If you’re building your BigCommerce store, these stats aren’t just numbers; they’re the key to turning casual browsers into satisfied customers.
Getting those customers onboard begins with a simple yet crucial step: accurately uploading your product details to your BigCommerce account. This blog is here to guide you through the process, offering straightforward steps along with expert advice at each stage. By the end, you’ll have the know-how to prompt your viewers to click that all-important “Buy” button.
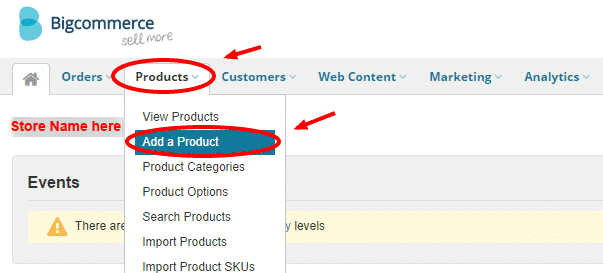
Step 1: Go to the ‘Add a Product’ page
If you are new to BigCommerce, make sure to create an account first. To add the product to your BigCommece store, you need to log in to the Admin page.
Once logged in, access the dashboard. Navigate to the “Products” tab, typically located on the left-hand side of the dashboard. Click on “Add a Product” to initiate the process of creating a new product listing.
You need to fill out three different sections – Detail, Image & Videos, and Other Details. All these sections contain the most important details of your product page.
Step 2. Add details to the product summary
We will start with the detail tab. The tab contains a “Summary” section. In this summary section, you need to fill in—

- Name
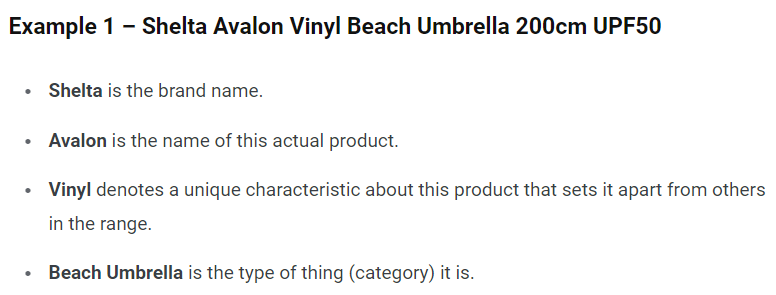
The product name should be within character limits and should contain the brand name, product name, special features, category, and quantity.
Remember to use the unique product name. This will help customers to remember your product name easily. Moreover, BigCommerce doesn’t allow sellers to keep duplicate names.
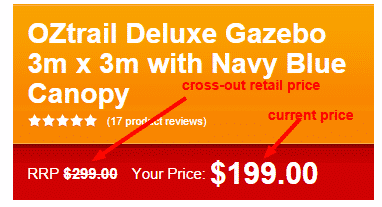
- Price
Set the price for the product. You have three different options for pricing – Cost Price, Retail Price, and Sales Price. Try to fill all of them for a better display of the prices on the store’s product page.
- Category
Choose a category that accurately represents the type of product you are selling. For example, if you’re selling clothing, categories could include “Men’s Apparel,” “Women’s Apparel,” etc. Moreover, you can find a “+” option – click on it for sub-categories. You will find a drop-down option, tick the correct checkbox where your product belongs.

- Weight
The weight is crucial for accurate shipping cost calculations. It helps determine the shipping fees based on the weight of the product. Ensure that the unit of measurement (e.g., pounds or kilograms) is consistent with your shipping carrier’s requirements.
- Product SKU
A SKU is a unique identifier for each product in your inventory. It helps you and your system keep track of your products. However, if you don’t have an SKU readily available, you can either skip this step or easily find suggestions through a quick online search.
Tips for product summary:
- Keep the product name concise but informative.
- Research competitor prices to set a competitive and fair retail price.
- Choose the most relevant category to improve the organization of your store.
- Be precise when entering the weight, as this affects shipping costs.
- Ensure the SKU is unique to avoid confusion in inventory management.
Step 3: Upload product images
After you have added all the details of the images, it’s time to add the image. Click on the “Images & Videos” tab. Use the “Add Images” button to upload high-quality images of your product. Arrange the images to ensure they showcase the product from different angles, providing a comprehensive view for potential buyers.
After uploading, make sure to give the name and a proper description of the image. Try to include dashes (-) as separators. Avoid using blank spaces or underscores(_).
Apart from images, 89% of the customers said they prefer a video of the product to make a purchase. Upload a video of the product.
Step 4: Add Other Details
To provide complete information to the viewer, add additional details about the product in the “Other Detail” tab.
Input details like warranty information, brand name, product UPC/EAN, and availability.

Step 5: Add unique product descriptions
Now that you have added images and other attributes of the product, you need to convert them into well-crafted sentences (AKA, descriptions).
Go back to the detail tab > description section, and start outlining key features, benefits, and any unique selling points. Create a narrative that sells your product within a given character limit.
Consider the following when crafting your product description:
- Clarity: Communicate what sets your product apart. Highlight its unique features and functionalities.
- Benefits: Emphasize how the product can improve the customer’s life or solve a particular problem. Explain the value they will gain.
- Specifications: Include relevant technical details, sizes, colors, or any other specifications that customers might find useful.
- Storytelling: If applicable, share the story behind the product or your brand. This can create a connection with customers.
- Formatting: Break down the description into readable sections with headings and bullet points. Avoid long paragraphs for better readability.
- SEO optimization: Incorporate relevant keywords naturally to enhance search engine visibility.
- Length: Aim for a balance. Provide enough information to make an informed decision but avoid overwhelming the reader with excessive details.
Remember, a product description needs to be unique, you do not want your customer to read something copied and pasted from the web.
Step 6: Save the changes
You have come a long way in uploading your products. To safeguard against potential technical issues and prevent any loss of information, just click ‘Save’ at the bottom of your Admin page.
Step 7: Add shipping and availability options
Under the detail tab, just near the product description option, you will find the “Shipping and Availability sections.”
Add a proper shipping detail, this will help the algorithm calculate the shipping cost for a particular product. Here, you can find different options like Free shipping, Fixed Shipping Cost, or None (here default shipping charges get calculated).
Mention the weight, height, and length accurately, as it directly influences shipping costs. Use a reliable scale to measure the actual weight of your products.
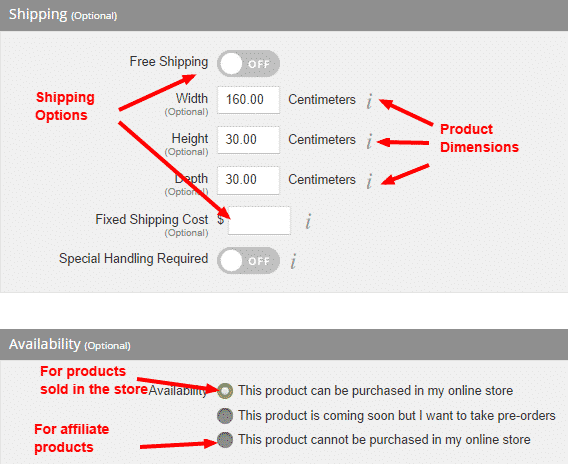
Now, provide availability options for your product.
- Stock status– Indicate whether the product is currently in stock. This information is crucial for managing customer expectations and preventing overselling.
- Order option- If applicable, set the availability option to “This product can be purchased in my online store” as default. Moreover, if you have an affiliated product, ensure that you choose the option “This product cannot be purchased in my online store.” This will help provide clarity to the buyer.
Step 8: Add metadata
SEO is the most important part of this product upload journey. Adding meaningful metadata is essential, as search engines utilize this information to understand both you and your products.
Go to Other Detail tabs>Search Engine Optimization> Page title & Meta Description tag.
Here’s a breakdown of the key elements:
Page title: This is the product title displayed on the search result page when customers browse for products. Keep it concise, within 70 characters, to ensure clarity and visibility.
Meta description: Positioned right after the page title, the meta description is a brief snippet of the product page. It should not exceed 155 characters. Craft a compelling description that not only incorporates relevant keywords but also provides value to potential customers.

Step 9: Final review
Once you’re done with all the steps mentioned above, click on the save button. Now, to know how it would appear to the viewers, You can like the “View this product in the store” link, present on the top of the page. At this stage, if you feel that you’ve made some sort of mistake, you can simply edit it again.
Step 10: Additional options that improve your product page
- Add related products
For up-selling or cross-selling, you can add related products. This encourages customers to purchase more items, boosting your average order value. Simply, click on the “Other detail tab>related products”. Here you encounter two options, one where the algorithm itself adds random products accordingly, and the other where you get the option to add it yourself. Explore both options and select whichever gives you a better option.
- Add inventory level
You will see an inventory-level tab on your product page. You can simply update the stock options here.
Let’s recap/Recap the journey: Essential points
- Log in and access “Add a Product.”
- Fill in key details: name, pricing, category, weight, and SKU.
- Upload high-quality images and videos.
- Craft unique and SEO-friendly product descriptions.
- Input precise shipping details and set availability.
- Optimize SEO with a concise page title and meta description.
- Review changes and preview the product.
- Consider related products.
- Regularly update inventory levels.
- Save your progress regularly.
Ensure your product page is a compelling, informative, and optimized representation of your offering on the BigCommerce platform.
But here’s a catch!
Everything that seems easy might not be time-efficient. This entire 10-step guide is for one product. You need to do it for your entire product list, each requiring the same level of attention to detail, from the initial setup to crafting unique descriptions.
At this point, you can choose an easy way out. Try to hire an expert to take charge of the technical aspects, allowing you to redirect your focus toward strategic business growth, customer relationships, and overall brand enhancement.
The best option is outsourcing BigCommerce product listing service. These experts can upload your product details on the Admin page and do other additional tasks like managing inventory, processing orders, and more.