
When you plan to switch to a new computer, one major task that you need to think of is transferring your important data such as email archives. This holds true especially for Microsft Outlook users, who want to transfer their OST files safely. These files have offline copies of crucial mail and other items as well. It may seem a very hectic task, but you obviously need to carefully handle it to protect sensitive data and information.
Don’t be afraid! This guide has got you covered. We’ll explore the top tips and tricks to effortlessly move OST file to new computer. No matter if you’re an IT expert, a professional user, or simply someone seeking a seamless transition to a new device, these methods will equip you to successfully move your OST files, leaving no important data behind.
Method to Transfer Outlook OST File to a New Computer
Below, we have mentioned the manual method to migrate OST file to new computer:
- Preparing the OST File on an Old Computer
- First find the OST file on your old computer. You can locate it within Outlook by going to File -> Account Settings -> Account Settings -> Data Files tab. Note the location of the OST file.
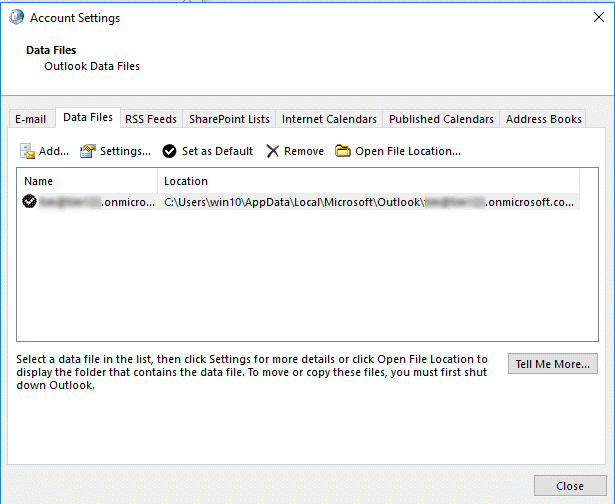
- Make sure your OST file is fully synchronized with the Exchange server. This step is essential to ensure that all your offline changes are updated online.
- Converting OST to PST
- The OST file is closely attached to the designated Outlook profile and cannot be transferred directly. So, you must first convert it into a PST (Personal Storage Table) file, which is easily portable.
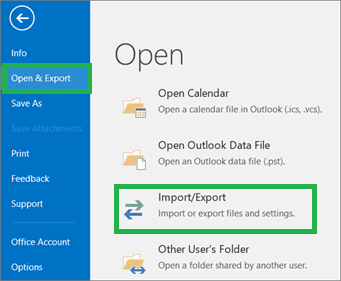
- The next step is to open Outlook and reach the File menu. Here, search for the option of Open & Export, and then select Import/Export.
- Clicking on the “Export to a file” option is the next step. After that, move on to the “Outlook Data File (.pst)” selection.
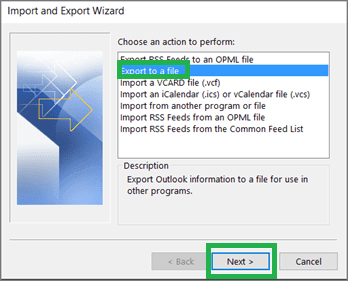
- You will witness a few prompts that you need to follow to export the data from your OST file into a PST file.
- Transferring the PST File to a New Computer
- To seamlessly and effectively transfer the PST file to a new computer, be sure to securely save it onto an external storage device like a USB drive. Alternatively, if possible, utilize network transfer for added convenience.
- Safeguard against the possibility of any data loss by meticulously copying or securely transferring the file across the network.
- Importing PST File into New Computer’s Outlook
- On your new computer, set up your Outlook account. You should enure that it is configured and connected to the server of your email.
- In Outlook on the new computer, go to File -> Open & Export -> Import/Export.
- Select “Import from another program or file” and choose the PST file you transferred. Follow the prompts to import all your data into your new Outlook profile.
- Verifying the Data Transfer
- OK, now the last step once you move OST file to new computer is to be assured that all of your emails, contacts, calendars, and other data have been successfully transferred.
- If there is something missing or incorrect imports, don’t panic! Just retry the process of importing and make sure the PST file doesn’t get damaged while transferring.
Roadblocks to Using Manual Methods to Move Outlook OST file to New Computer
If you manually want to transfer OST file to a new desktop, it could prove challenging and may require a certain technical expertise. Going through the whole process can be overcomplicated and daunting for users without any understanding of Outlook’s file system and settings. Plus, manually transferring and importing data can waste your time a lot. This is especially true if you are handling large files or multiple accounts.
Regain OST to PST Converter: A Professional Tool to Copy OST file to New Computer
As we saw above that manual methods come with a set of limitations. In such cases, it’s better to rely on a professional tool like Regain OST to PST converter. This tool has a simple interface, which makes the transfer process quite easy.
If you are not tech-savvy, then manual methods can be overly complicated and tedious process for you. Regain overcomes this challenge by providing clear instructions and a sleek GUI. OST files can be easily converted to PST format without lengthy steps as required by manual methods. This, ultimately saves a lot of time when dealing with large OST files.
You can transfer all sorts of data with Regain, such as emails, attachments, calendar events, and contacts, without any risk of data loss or corruption.
Note: If you want to import your OST files into Office 365 then you can use the Regain OST to Office 365 Migration Tool.
Wrapping Up!
Transferring the OST file to a different computer requires a lot of time plus it’s complicated. But there are effective strategies to make this task manageable. To streamline the process and enhance the user experience, utilizing professional tools like Regain proves to be the smarter choice.
With its efficient OST to PST converter, Regain simplifies the process, ensuring swift and secure data transfer with minimal risk of data loss. This makes it the top choice for individuals and businesses alike looking to seamlessly transfer their crucial email data to a new system.