You may encounter cases that you need to record content on your computer screen. Whether you need to take a screencast of the application you’re writing about or have a presentation that you are going to share with others, there are many tools to record the screen that you can use.
Some are chargeable, sometimes heavy and complicated. How to record the computer screen easily and free? Let’s take a look at one of the top options to make your computer screen recording experience work best.
RecordCast is a new online service that lets you record videos of what’s happening on your computer screen with one click. It has many advantages, first and foremost, being completely free and requiring no special installation.
How to record video clips
It allows you to record yourself from a webcam while recording the screen. We have prepared a step-by-step tutorial that will help you record your videos with RecordCast easily. Check it out below!
Step 1. Access to the website

It is possible to access the tool and register with a Google or Facebook account. It’s optional, not a must. If you like, you can register an account using your email as well. After opening the website Recordcast.com, you can click “Start Recording” to get started.
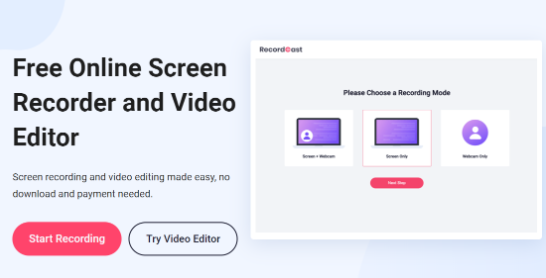
Step 2. Make settings

It’s time to decide your recording mode, an audio option, and the recording area. First, let’s decide on the recording mode.
- Screen + Webcam: This allows you to share your screen and camera.
- Screen only: This allows you only to share your screen.
- Webcam only: Record the camera only.

Then, it will ask you to decide on an audio option from the followings:
- Microphone + audio system
- Microphone
- System sound
- No sound

After selecting the audio recording option, you can select which screen you want to record:
- Entire screen: It is possible to record the entire computer screen on your computer, including browser tabs and application window.
- Application window: It can record and control windows of any application program.
- Current tab: Even all camera and screen sharing options are available, the tab or other information will not appear on your screen during recording, except the chosen tab.
After every setting is done well, the recording is working.
Step 3. Download and edit your video
To finish your video, click “Stop sharing”. With RecordCast, you are able to download your recording in WEBM file format directly to your computer. Or you can edit it in RecordCast and export it in MP4 file format if you prefer.
Edit your saved video clips

When it comes to RecordCast’s video editor, you can upload photos into your video clips, setting it as your video covers to your liking. Besides, you are free to add text and adjust the style of the text. You can do more to your recordings, such as crop, split, zoom in/ out, etc.
Main features
- Completely free of charge.
- It doesn’t require any installation.
- Capture your screen and webcam simultaneously.
- Record audio from your system and microphone at the same time.
- Flexible adjustments for perfect screen recording.
- Built-in video editor for convenient editing.
Conclusion
RecordCast online screen recorder appears to outperform other similar free tools, with its support for basic recording options, as well as many advanced editing features that some simply lack. This tool allows you to save your computer screen without the need to install other software, and the quality of the resulting files is also good.
Now that you see how to record your computer screen using RecordCast. Have you tried the RecordCast screen recorder yet? Why not get to its homepage and start producing screen recording now?