When you look at a large building like a warehouse, a factory, or a farm shed, you see the roof and the walls. But underneath those surfaces, there is a hidden steel frame that holds everything together. One of the most important parts of that frame is a simple, C-shaped piece of steel called a C purlin. This article explains how C purlin steel works with rafters, girts, bridging, and wall cladding to create a strong and stable building. You will learn what these parts do and how they fit together.
The Role of C Purlins in the Secondary Framing System
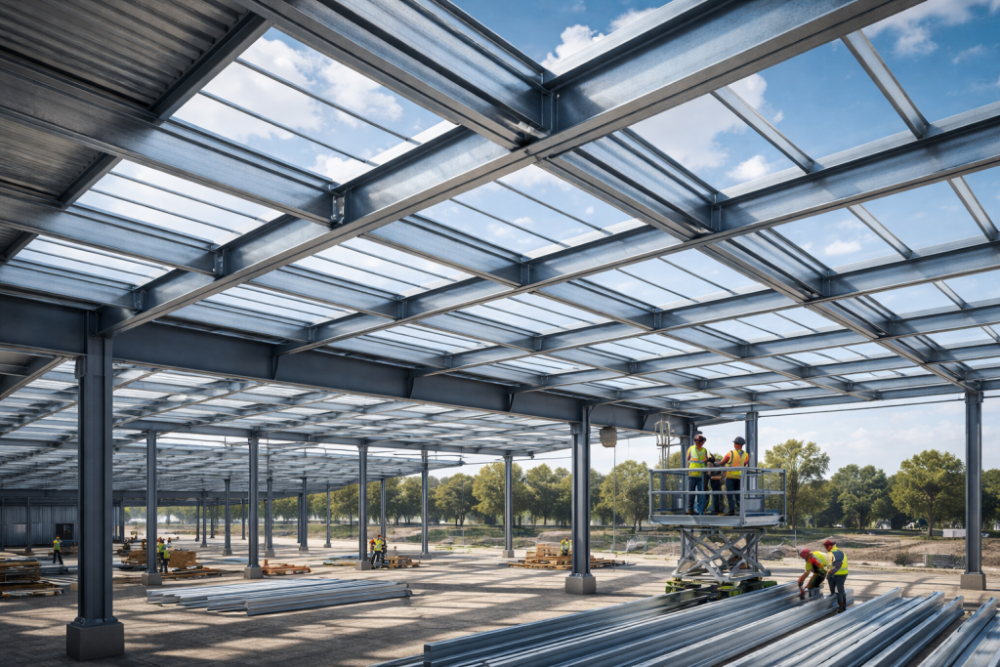
In steel building construction, there are two levels of framing. The primary framing consists of large rafters and columns. These carry the main weight of the building. The secondary framing consists of smaller members that attach to the primary frame. C purlins are a key part of this secondary system. Their job is to support the roof sheets and wall cladding, and to transfer the weight of those surfaces down to the main rafters and columns.
What Are C Purlins?
A C purlin is a steel section that is shaped like the letter C when you look at it from the end. It has a flat web in the middle and two flanges that stick out on the same side. This shape gives the steel strength while keeping it light. C purlins are made by roll-forming from a flat coil of steel. They come in different depths, flange widths, and thicknesses. Common depths range from 75 mm to 300 mm. The C shape allows other building parts to attach easily, and it also makes the purlin stiff enough to span long distances between rafters.
Purlins vs. Girts
People often use the terms purlin and girt as if they are the same, but they have different jobs. A purlin is a horizontal member that runs along the roof, attached to the top of rafters. Its job is to hold up the roof cladding. A girt is a horizontal member that runs along the wall, attached to the side of columns. Its job is to hold up the wall cladding. Both are often made from the same C-shaped steel section. So a C purlin can act as a purlin on the roof and as a girt on the walls. Knowing the difference helps when reading building plans and ordering materials.
From Rafters to Cladding: The Load Path
Every building has a load path. This is the route that weight travels from the top of the building down to the ground. The roof cladding (metal sheets) sits on top of the purlins. The purlins sit on top of the rafters. The rafters connect to columns. The columns go down to the foundation. So any weight on the roof like rain, wind, or snow goes first to the cladding, then to the purlins, then to the rafters, then to the columns, and finally to the ground. This is called a roof load distribution system. C purlins are an essential link in that chain.
Connecting C Purlins to Rafters: The Foundation of the Roof
The connection between a purlin and a rafter must be strong. Usually, the purlin sits on top of the rafter and is bolted or welded in place. In many steel buildings, the purlin is placed across several rafters, spanning from one rafter to the next. The spacing between rafters is often 4 to 6 metres. The purlin must be strong enough to carry the roof load across that gap without bending too much. The connection point is also where the purlin transfers the load down into the rafter. Engineers calculate the correct purlin size and spacing based on the expected loads and the rafter spacing. For a typical shed, purlins might be spaced about 1.2 to 1.5 metres apart.
Using C Purlins as Girts for Wall Framing
On the walls, the same C-shaped steel becomes a girt. Wall girts run horizontally between columns. They are attached to the outside face of the columns or sometimes between the columns. The wall cladding is then screwed to the girts. Just like roof purlins, wall girts must be spaced correctly so the cladding does not sag or ripple. The spacing is usually similar to roof purlins, around 1.2 to 1.5 metres. Using the same steel section for both roof purlins and wall girts simplifies ordering and construction. This is one reason why C purlin steel is so common in steel framing systems.
Bridging: The Key to Preventing Purlin Roll and Buckling
A single C purlin standing alone can twist or roll when a heavy load is placed on it. This is because the C shape is not fully symmetrical. To stop this movement, builders add bridging. Bridging consists of small steel angles or flat bars that connect one purlin to the next. They are installed in a zigzag or straight line across the top and bottom flanges of the purlins. Bridging does two things. First, it keeps each purlin upright so it cannot roll sideways. Second, it helps spread the load across several purlins, so one purlin does not have to carry all the weight. Without bridging, a long purlin can buckle or twist, and the roof can fail. With bridging, the whole roof acts as one strong unit.
How Wall Cladding Attaches to C Purlins and Girts
Once the purlins and girts are in place and the bridging is installed, the building is ready for cladding. Roof cladding is usually metal sheets with raised ribs. These sheets are laid across the purlins and fastened with self-drilling screws. The screws go through the sheet and into the top flange of the C purlin. On the walls, the same process happens. The wall cladding is screwed into the girts. The C shape of the purlin or girt gives a flat surface for the screw to bite into. It also leaves the back of the flange open so water and condensation can drain away. Good attachment between cladding and purlins is vital. If the screws miss the steel or pull out, the cladding can lift in high winds. Builders use special screw patterns and washers to create a weathertight seal.
Conclusion: The Integrated System for a Strong, Stable Building
C purlin steel may look simple, but it plays a big role in modern roofing systems. It works as a purlin on the roof to support cladding and transfer loads to the rafters. It works as a girt on the walls to hold wall cladding. Bridging keeps the purlins from rolling or buckling. And the connections between each part ensure that weight moves safely down to the foundation. When all these pieces are designed and installed correctly, the result is a building that is strong, stable, and long-lasting. Whether you are building a small shed or a large industrial warehouse, understanding how C purlins work with rafters, girts, bridging, and wall cladding will help you appreciate the hidden steel frame that makes it all possible.