
Among many eCommerce platforms, OpenCart stands out as a versatile and robust solution for developing online stores. Building an eCommerce site using OpenCart not only lets you showcase your products and services to potential customers but also provides the required features and tools to create a user-friendly shopping experience.
The below two images [Source – trends.builtwith.com] demonstrate the reputation of OpenCart in the online market.
- OpenCart is depicted as the 3rd most popular technology among the top 1 million sites in the multi-channel category.

Img src : https://trends.builtwith.com/shop/OpenCart
- Around 306,293 live websites are using OpenCart depicting its immense usage in online store development.
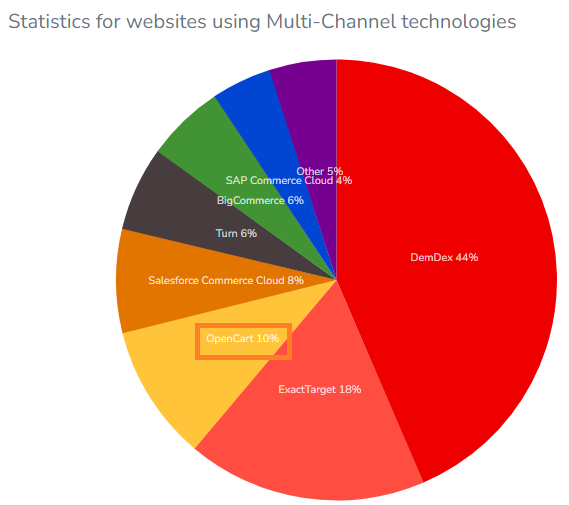
Img src : https://trends.builtwith.com/shop/multi-channel/
Moreover, with a strong user base and community support, OpenCart provides a reliable foundation when using it to build an online store, ensuring eCommerce success. When using OpenCart for eCommerce website development, you will find yourself a part of a thriving ecosystem where assistance and resources are readily available.
Continue reading to learn the essential steps for creating a successful online store on OpenCart, trusted by hundreds of thousands of online retailers worldwide.
How to build an OpenCart eCommerce store?
From downloading and installing to selecting themes, managing products, and optimizing for search engines, there are various steps involved in developing an eCommerce store using OpenCart.
Let’s have a closer look at the process.
1. Get a domain and hosting account
Start by choosing a unique domain name for your eCommerce store. This is your website’s address (e.g., www.example.com). Also, select a reliable web hosting provider that offers suitable hosting plans for your needs. Ensure the hosting meets OpenCart’s system requirements, including PHP and MySQL compatibility.
2. Install OpenCart
Visit https://www.opencart.com/ and download the latest version of the platform. You’ll receive a compressed ZIP file containing all the necessary files and folders for installation.
Then, prepare a hosting that meets OpenCart’s system requirements. After downloading, upload the ZIP file to the server and then extract it. Another step essential at this point is: to go to the admin folder within the Upload folder and rename the file from “config-dist.php” to “config.php.” At last, move all your files and folders to the root of your server.
Once the above-mentioned steps are completed, go to your online store’s homepage and follow the below process –
- Read the License Agreement and click continue to accept it.
Img source : https://www.hostinger.in/tutorials/opencart/how-to-install-opencart-manually
- You will be directed to a pre-installation page to check if your hosting environment meets all OpenCart’s requirements. Hit Continue if you find that every tick is green.

- After that, fill in the required database credentials like username and password, and click Continue.

Img source : https://docs.opencart.com/installation/
- Now, the installation process is complete. You will receive a message to delete the installation directory. Once done, navigate to the administration panel to set up your online store.

If you find the installation challenging or lack the expertise to perform the same, we recommend you hire an OpenCart developer to do it without any hassle.
3. Go to the OpenCart admin panel
This side of the store lets you customize your online store’s look and feel by uploading images, adding products, and so on. After a successful login, you will be redirected to your admin dashboard, which will appear similar to the image below.

Img Source : https://docs.opencart.com/administration/
Initially, no analytical data will be available on the dashboard due to the lack of analysis for a freshly created OpenCart store.
4. Get a theme
To get a theme for your OpenCart store, you have several options like the OpenCart marketplace, third-party theme providers, and custom theme development.
OpenCart offers a variety of themes to choose from, both free and premium. After exploring OpenCart’s collection, you can opt for custom development if you don’t find a theme that perfectly suits your eStore needs. However, this requires technical expertise and can be a complex and time-consuming process. Therefore, it’s often better to contact an OpenCart development company to get the desired theme created.
Once your theme is finalized, upload it to your OpenCart installation directory on your web server. After that, Log in to your OpenCart admin panel and follow the below steps –
- Navigate to the Extensions -> Extensions -> Extension Type. Here, you will find options like “Modules,” “Themes,” “Payments,” and so on. Select Themes(1) as shown in the below image.
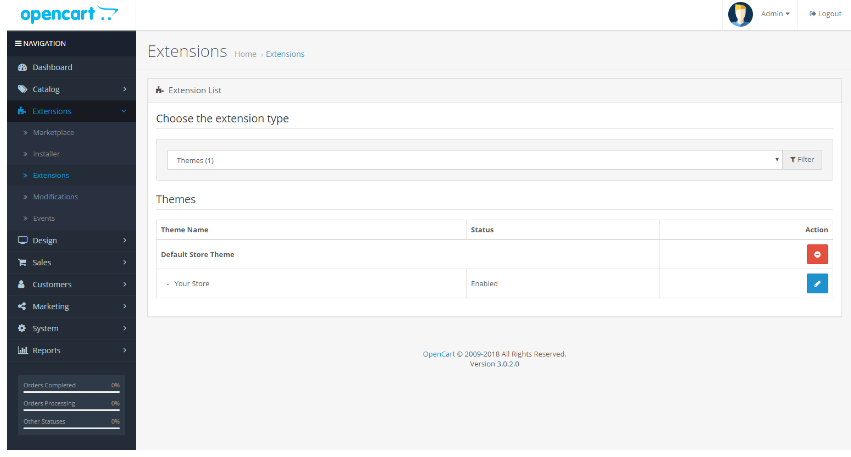
Img Source : http://docs.opencart.com/en-gb/extension/theme/
- After selecting Themes(1), you will be able to view a Themes Bar. Here’s how it will look –

Img Source : https://kb.templatetoaster.com/upload-theme-opencart-tutorial-guide/
- Go to the “Default Store Theme” column, which contains the list of installed themes. Look up the newly installed theme or click the one you want to configure. Then, make the desired changes to the theme’s settings and save it.
5. Upload products
OpenCart lets you add categories and products by following a series of steps including adding, editing, and managing the product listings.
Below is the step-by-step process of uploading products in OpenCart –
- Log in to your OpenCart admin panel.
- Navigate to the “Catalog” section.
- Add products and their categories to your OpenCart store.
To add a new category
Click Catalog -> Categories -> Add new. You will now be able to see four tabs (General, Data, SEO, and Design), as shown in the below screenshot.
- In the General tab, you can enter the category name with its description and other relevant data.
- The Data tab lets you choose a parent category, category image, and so on.

To add a new product
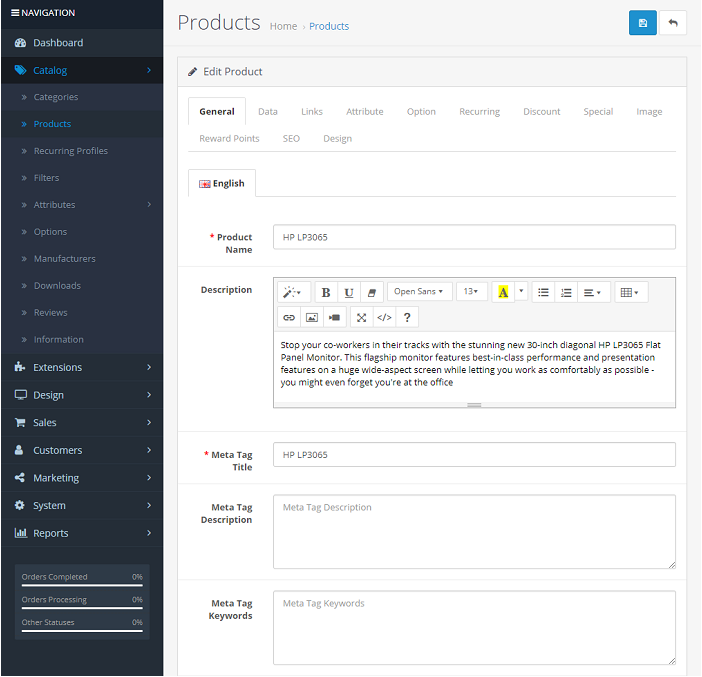
To add an item to your OpenCart store, navigate to Catalog -> Products and click Add New. After that, you will be taken to a product form where you can enter your product details.
The below image depicts the General tab in the Products section where you can fill in data like product name, description, meta details, and others.
Img Source : https://www.cloudways.com/blog/setup-opencart-ecommerce-store/
Furthermore, when switching to the Data tab, you can fill in information such as model name, price, quantity, status, and so on.

The next tab, which is the Links tab, allows you to fill in details like product manufacturers, categories, filters, etc. Similarly, each tab in the Product section requires you to fill in relevant product information.
6. Integrate additional functionalities using an extension
To add additional functionalities to your OpenCart store, you can use extensions or modules. OpenCart has robust extensions that let you enhance and customize your store’s features.
The “Extensions” section in OpenCart’s admin interface enables you to manage and extend the functionality of your online store as per your needs.
Here’s how to add additional functionalities to your OpenCart store –
- Log in to your OpenCart admin panel.
- Access the Extensions section.
- Choose the extension type from different options like modules, payments, shipping, and more.
- In your selected extension type category, you will see a list of installed extensions of that type. You can view, enable, disable, or uninstall them as required.
7. Configure payments
To make online purchases secure for your customers, it is essential to configure payment methods in an online store. OpenCart offers various built-in payment options, and you can also install additional payment extensions if required.
Here is how to configure payment methods in an OpenCart store –
- Log in to your OpenCart admin panel.
- Navigate to the payment methods section by clicking on Extensions -> Payments.
- Here, you’ll find a list of available payment methods that come pre-installed with OpenCart. These can include options like “Bank Transfer,” “Cash on Delivery,” “PayPal Standard,” and more.
- To enable a payment method, click the “Edit” button next to the method you want to configure.
Conclusion
OpenCart’s user-friendly interface, extensive customization options, and robust features make it a valuable tool for entrepreneurs and businesses. By following the key tactics covered in this guide, you can create a compelling online store and engage your customers effectively.
However, if you are not familiar with the platform or not tech-savvy, creating an OpenCart store can be complex. In such cases, you can approach an OpenCart development company who have vast expertise in building high-quality, customized eStores as per client’s needs.