But, before we get started, let’s clarify what neoprene is. Neoprene, often known as scuba fabric, is a double-knit fabric that is sumptuous, smooth, and sturdy. Because of its various properties, such as stain resistance and general durability, neoprene has become more popular as a material to wear and use (on land and water). Continue reading to discover more about neoprene sewing and maintenance. It gives structural items excellent stability and is surprisingly simple to sew since it doesn’t need interfacing or linings like lighter fabrics. Because sewing neoprene is already thicker and has a built-in structured drape, it doesn’t need to be lined.
To be labeled a “scuba knit,” a fabric must contain a rubber core and need special maintenance. However, since neoprene fabric is often known as scuba, felt compelled to mention it here.
Neoprene is a water- and temperature-resistant material used in various applications. Neoprene is used to make scuba gear, orthopedic braces, mouse pads, can coolers, and laptop bags, to name a few. With thicknesses ranging from 0.5 mm to over 7 mm, neoprene may be challenging to work with on a home sewing machine. Here are some neoprene stitching tips.
Examine the raw edge of your cloth to identify the difference. You’re looking at neoprene if it has a waffle-weave core that isn’t firm and squishes somewhat when pressed between your fingers. You’re holding scuba if the raw edge of your cloth appears like two thin pieces of fabric sandwiching a black rubber core. This post will explain how to work with sewing neoprene fabric in detail.
Overview of Neoprene:
In the early 1930s, Dupont developed sewing neoprene tips as a substitute for natural rubber. Neoprene is a two-ply fabric that can endure temperatures ranging from -50 to 275 degrees Fahrenheit. It comes in various thicknesses, ranging from 3-5 millimeters.
Neoprene has a variety of applications.
While sewing neoprene has several usages in military and legislative groups, it also has a lot of other purposes in fashion, accessories, sports, and industrial sectors.
- Swimsuits
- Cases for electronics
- Sports bras/sportswear
- Lunch totes
- Koozies
- Mouse Pads
- Gloves
- Scuba equipment/wetsuits
Characteristics of Neoprene:
It’s an excellent option for various purposes since it has so many outstanding features.
- Resistant to water and the elements
- retaining heat
- Excellent elasticity
- Chemically unaffected
- Eesistance to abrasion and tear
- Resistant to solvents
- Resistance to oil
- Fireproof
- Non-toxic
Neoprene Garments should be washed:
The general guideline is to wash it carefully when it comes to neoprene. Use the suggestions below to get the most out of your neoprene.
- Launder your clothes in cold water.
- Do not use a washing machine or dryer.
- Scrub neoprene by hand with light soap and ring dry
- Instead of using hangers, hang items to dry inside on a level surface.
- When drying, turn the garment inside out to avoid stiffness.
4 Neoprene Sewing Tips
1st Step
Place the neoprene fabric on a clean, level surface to work with. Using T-pins, secure the design to the cloth. It may be simpler to sketch around the design with your fabric pencil, remove the pattern piece, and then cut more significant amounts of neoprene. After you’ve pinned all of the pattern pieces together, cut them out one by one: Mark all notches and other pattern requirements on each piece using the fabric pencil.
While you’re getting ready for your crafts, first wash your cloth in cold water. Because neoprene may be damaged by high heat, I suggest washing it in cold water and iron it on the lowest setting possible. Allow the cloth to air dry as well, since excessive heat from tumble drying might harm neoprene.
2nd Step
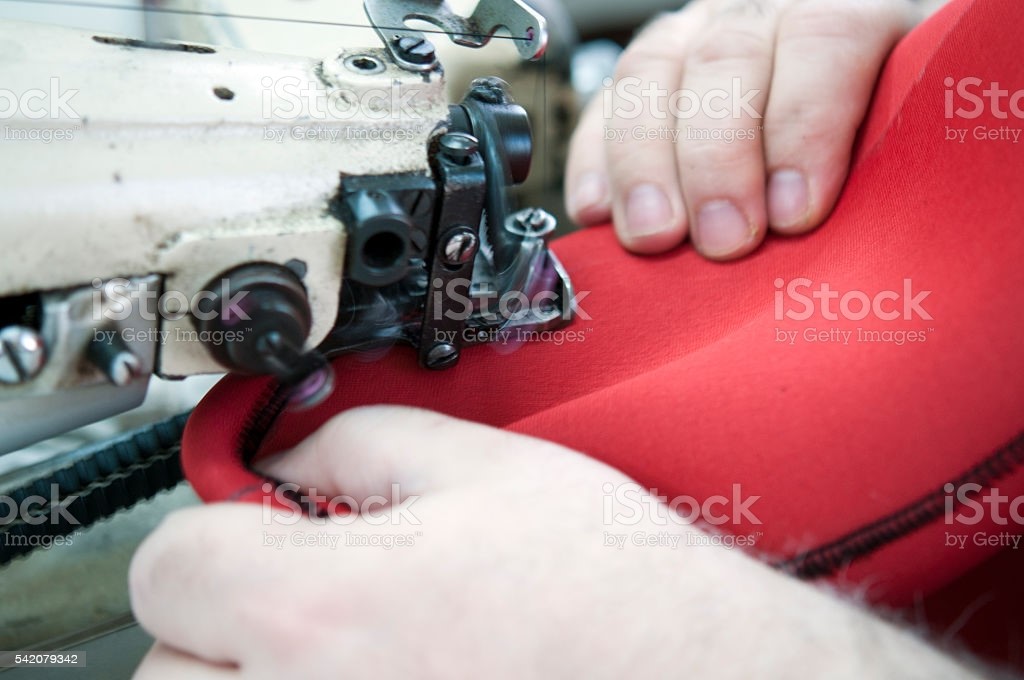
Connect your sewing machine to the walking foot. This kind of foot ensures a more consistent feed and reduces stitching slippage. Insert a 16/100 jean/denim needle in the needle housing. Because they are not sharp enough to puncture through the layers of neoprene, more minor, weaker hands will form tangles and break during sewing. Thread your machine with 100% polyester or heavy-duty nylon thread and wind two or three bobbins.
You may leave all of the hemlines uncooked and make your designs that much more straightforward to sew since scuba and neoprene fabric doesn’t roll and has such a lovely drape, to begin with. Using my rotary blade to make smooth cuts provides the hemlines with a tidy finish with minimal work. It’s a win-win situation!
3rd Step
To determine the ideal settings for your machine, adjust tension and stitch length on a scrap piece first. With sewing neoprene, longer stitches work better, and a looser tension prevents knots or nesting at the bottom of the cloth.
To avoid snagging or slippage, use a ballpoint needle to prepare your sewing machines for this job.
4th Step
Begin building by following the pattern’s or design’s instructions. Assemble the parts so that the edges are even and any marks or notches are correctly aligned. Hold the two pieces of fabric together with equal pressure as you put them through the machine, being careful not to stretch them.
To avoid bunching beneath the presser foot, use a walking foot. It made it much easier to pass the cloth through the sewing machine before it began to slide.
For neoprene thicker than 4 mm, an industrial sewing machine is suggested. For increased durability, use fabric glue to bond seams together before sewing. Experiment with several stitches (zig zag, double) to see which one works best with your design and machine.
Author Bio
Guest blogger is a well-known SEO Expert for tech, business, food, and Multiple Niches…