Plugging in our HDMI cable and getting no response is quite frustrating, I know. But it’s not a big deal with Windows 10 and 11 users, so don’t freak out. These HDMI not working issues can be fixed. I’ve mentioned some ways to simply get out of this issue and get your second screen or audio output.
First, Check the Basics
- Before diving into driver updates, let’s rule out the obvious.
- Make sure your HDMI cable isn’t damaged.
- Try a different HDMI port (if available).
- Confirm the input source is correctly selected on your monitor/TV.
- Restart both your PC and the external display.
If you’ve done all that and it’s still not working, let’s dig into the software side.
1. Update HDMI Driver on Windows 10/11
An outdated or missing driver is often the reason your HDMI not working connection fails. Here’s how to update it:
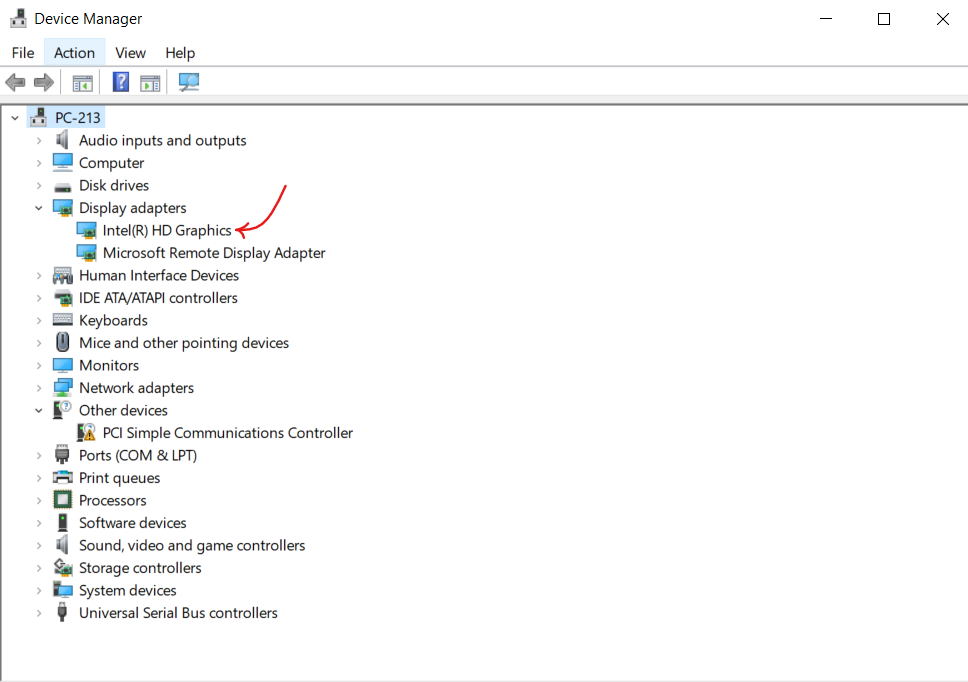
- Press Win + X and click Device Manager.
- Expand Display adapters.
- Right-click your graphics card (e.g., Intel, NVIDIA, AMD) and choose Update driver.
- Select Search automatically for drivers.
- Repeat the same under Sound, video, and game controllers if HDMI audio isn’t working.
This method will update your HDMI driver for Windows 10 or 11 to the latest version if available.
Do you also look for an easier way to fix this problem, just like me?
Don’t worry, we have one!
You can use Advanced Driver Updater, a tool that can take our headache away. Advanced Driver Updater scans your system and finds outdated drivers. It presents all the outdated drivers in front of you for you to know which drivers need an update, and then you can update them all together with just a few clicks. Trust me, it’s a great way to avoid manual driver searches and the long hassle, and keep your system up-to-date and smooth.
But why Advanced Driver Updater?
We all know that manually checking and updating drivers is hectic; let’s be honest, it is a tough task. And why face all this hassle when you can make things easier with Advanced Driver Updater?
This powerful tool automatically scans your system for outdated or missing drivers and takes no long. Not just that, it includes graphics and HDMI-related drivers, and updates them with just one click.
Benefits of Advanced Driver Updater:
- One-Click Driver Updates
- Supports Massive Driver Database
- Improves System Performance
- Fixes common Hardware issues
- Driver Backup and Restore
- Can Schedule Scan
- User-friendly Interface
- Saves Time and Manual Effort
This tool is a great way to keep your system up-to-date without any manual hassle.
2. Download the HDMI Driver from the Manufacturer’s Website
Sometimes the Device Manager misses updates. In that case:
- Go to your PC or graphics card manufacturer’s website (e.g., Dell, HP, Intel, NVIDIA).
- Search for your model and download the latest HDMI or graphics drivers.
- Install and restart your system.
Note- Always choose the driver version compatible with your Windows version, the HDMI driver for Windows 10 or the HDMI driver for Windows 11.
Example,
3. Roll Back Driver (If the Issue Started Recently)
If HDMI stopped working after a recent update:
- Open Device Manager.
- Right-click your graphics driver > Properties.
- Go to the Driver tab and click Roll Back Driver (if available).
4. Set HDMI as the Default Output
Sometimes Windows doesn’t auto-detect HDMI as the default.
- Go to settings
- Click the Sound icon > More sound settings > Playback tab.
- Select your HDMI not working device and click Set Default.
- Click OK.
For display:
- Open Settings> Display settings.
- Scroll to Multiple displays and click Detect.
- Use Extend or Duplicate depending on your setup.
5. Run the Hardware & Devices Troubleshooter
This helps detect and fix hardware connection issues:
- Press Win + R, type msdt.exe, and press OK
- Then enter id DeviceDiagnostic, and press Enter.
- Follow the on-screen prompts to complete the troubleshooting.
Bonus: Try a Clean Boot
If third-party apps or drivers are interfering with HDMI detection:
- Press Win + R, type msconfig, and press Enter.
- Go to Services tab > Check Hide all Microsoft services > Click Disable all.
- In Startup tab > Open Task Manager > Disable all startup items.
- Restart your PC.
This will start your system with basic services. Check if HDMI is working with this. If yes, then the issue lies in a third-party app.
Conclusion
Whatever the reason is, an outdated driver, a wrong setting, or a glitchy app, HDMI not working can be fixed with the steps above. Either simply use tools like Advanced Driver Updater and save your time and efforts, it will make sure to update HDMI not working drivers for Windows 10/11 regularly, otherwise, these steps can also get you out of it. But if nothing works, try another cable or contact your manufacturer’s support to fix your HDMI.