Xamarin is such an amazing platform that provides support for some magnificent features like platform-specific UI elements, drop-down control, swipe view, animation support, way of handling multilingual features in Xamarin forms, etc. Here, in this blog, we will put a light on the Drop-down control in Xamarin.Forms.
In Xamarin.Forms we have control Picker for both Android and iOS platforms from which we can select an item from the list. Picker is a view control for picking items from the list. It displays the list of items and we can select it. It works like drop-down control in Xamarin Forms. We can add items into the picker using string.
Following properties are defined by Picker: CharacterSpacing, FontAttributes, FontFamily, FontSize, TextAlignment, ItemsSource, SelectedIndex, SelectedItem, TextColor, Title, TitleColor.
Syntax for creating picker
<Picker Title=” ” >
<Picker.Items>
<x:String>Item1</x:String>
<x:String>Item2</x:String>
.
<x:String>Itemn</x:String>
</Picker.Items>
</Picker>
Example:
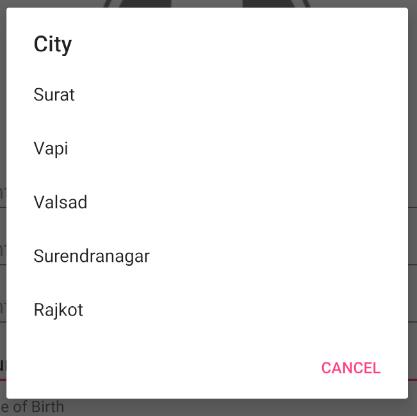
<Picker Title=”City” HorizontalOptions=”FillAndExpand”>
<Picker.Items>
<x:String>Surat</x:String>
<x:String>Vapi</x:String>
<x:String>Valsad</x:String>
<x:String>Surendranagar</x:String>
<x:String>Rajkot</x:String>
</Picker.Items>
</Picker>
Figure: Picker for city
In Xamarin.Forms spinner control represents drop-down only in the Android platform, for iOS there is no Drop-down control like a spinner. Spinner class is a view that will display a single element/child at a time and a user can select it. Xamarin.Forms control is a wrapper to platform-specific, like for in Android entry is the wrapper of EditText and in the iOS entry is a wrapper of UITextField. We can create a simple spinner by doing the following simple steps.
We will be going to create a simple drop-down of cities for that we have to add this code inside our project >> Resources >>Layout >>Main.axml. TextView and Spinner is an attribute that refers to the same string resources.
<TextView android:layout_width=”fill_parent” android:layout_height=”wrap_content”
android:layout_marginTop=”10dip” android:text=”@string/city_prompt” />
<Spinner android:id=”@+id/spinner” android:layout_width=”fill_parent”
android:layout_height=”wrap_content” android:prompt=”@string/city_prompt” />
Now, modify inside Resources/Values/Strings.xml. The list of strings that will display in the spinner is defined by <string-array> and the <string name= “city_prompt”> defines the title which is a refer by TextView and Spinner defined in the above code.
<resources>
<string name=”app_name”>City</string>
<string name=”city_prompt”>Choose City</string>
<string-array name=”city_array”>
<item>Surendranagar</item>
<item>Valsad</item>
<item>Rajkot</item>
</string-array>
</resources>
Example:
We will be going to create a drop-down using Xamarin.Forms inside our project in which will going to use renderer. We will create one drop down for the cities and display the selected city. We will do the following steps:
Implement below code after creating a new application inside the renderer folder of the project. Here, we have created renderer and inherit View in the class, and then created bindable properties and events that are required for the dropdown.
public class Dropdown : View
{
public static readonly BindableProperty ItemsSourceProperty1 = BindableProperty.Create(
propertyName: nameof(ItemSources),
returnType: typeof(List<string>),
declaringType: typeof(List<string>),
defaultValue: null);
public List<string> ItemSources
{
get { return (List<string>)GetValue(ItemsSourceProperty1); }
set { SetValue(ItemsSourceProperty1, value); }
}
public static readonly BindableProperty SelectedIndexProperties = BindableProperty.Create(
propertyName: nameof(SelectedIndex),
returnType: typeof(int),
declaringType: typeof(int),
defaultValue: -1);
public int SelectedIndex
{
get { return (int)GetValue( SelectedIndexProperties ); }
set { SetValue(SelectedIndexProperties, value ); }
}
public event EventHandler<ItemSelectedEventArgs> SelectedItem;
public void OnItemSelect(int pos)
{
SelectedItem?.Invoke(this, new ItemSelectedEventArgs() { SelectedIndex = pos } );
}
}
public class ItemSelectedEventArgs : EventArgs
{
public int SelectedIndex { get; set; }
}
}
Now, we will create a new class inside the Android project name it DropdownRenderer and add View Renderer and add assembly, export renderer above namespace for linking drop-down view in Android platform from the standard project.
This is a very important step for the custom renderer. Then we will override methods. OnElementChanged and OnElementPropertyChanged. OnElementChanged is triggered when the element initializes and when the element property is changed OnElementPropertyChanged will call. Now, set native control inside OnElementChanged method using setNativeControl() method. For Spinner control set Item Source using array adapter, create an event for a spinner for selected item same way assign item source and selected index to the spinner for property change using the method OnElementPropertyChanged ().
using System.ComponentModel;
using Android.Content;
using Android.Widget;
using Xamarin.Forms;
using Xamarin.Forms.Platform.Android;
using DropdownControl;
using DropdownControl.Droid;
[assembly: ExportRenderer( typeof( Dropdown ), typeof( DropdownRenderer ))]
namespace DropdownControl.Droid
{
public class DropdownRenderer : ViewRenderer<Dropdown, Spinner>
{
Spinner spinner;
public DropdownRenderer(Context context) : base(context)
{
}
protected override void OnElementChanged( ElementChangedEventArgs<Dropdown> ex )
{
base.OnElementChanged(ex);
if (Control == null)
{
spinner = new Spinner(Context);
SetNativeControl(spinner);
}
if (e.OldElement != null)
{
Control.ItemSelected -= OnItemSelected;
}
if (e.NewElement != null)
{
var view = e.NewElement;
ArrayAdapter adapter = new ArrayAdapter( Context, Android.Resource.Layout.SimpleListItem1, view.ItemSources );
Control.Adapter = adapter;
if (view.SelectedIndex != -1)
{
Control.SetSelection(view.SelectedIndex);
}
Control.ItemSelected += OnItemSelected;
}
}
protected override void OnElementPropertyChanged(object sender, PropertyChangedEventArgs ex)
{
var view = Element;
if (e.PropertyName == Dropdown.ItemsSourceProperty1.PropertyName)
{
ArrayAdapter adapter = new ArrayAdapter( Context, Android.Resource.Layout.SimpleListItem1, view.ItemSources );
Control.Adapter = adapter;
}
if ( e.PropertyName == Dropdown.SelectedIndexProperties.PropertyName)
{
Control.SetSelection( view.SelectedIndex );
}
base.OnElementPropertyChanged( sender, ex );
}
private void OnItemSelected( object sender, AdapterView.ItemSelectedEventArgs ex )
{
var view = Element;
if (view != null)
{
view.SelectedIndex = e.Position;
view.OnItemSelect( e.Position );
}
}
}
}
Main page here, we have used costume renderer to display drop-down and created a label to display the selected city.
<StackLayout HorizontalOptions=”FillAndExpand”
VerticalOptions=”Center”
Spacing=”10″
Margin=”20″>
<Label Text=”Choose City” TextColor=”Black” HorizontalOptions=”Center” VerticalOptions=”Center”/>
<local:Dropdown HorizontalOptions=”FillAndExpand”
VerticalOptions=”Center”
BackgroundColor=”Gray”
x:Name=”dropdown”/>
<StackLayout HorizontalOptions=”FillAndExpand”
VerticalOptions=”Center”
Padding=”10″
>
<Label HorizontalOptions=”Center”
VerticalOptions=”Center”
x:Name=”label”
TextColor=”Red”/>
</StackLayout>
</StackLayout>
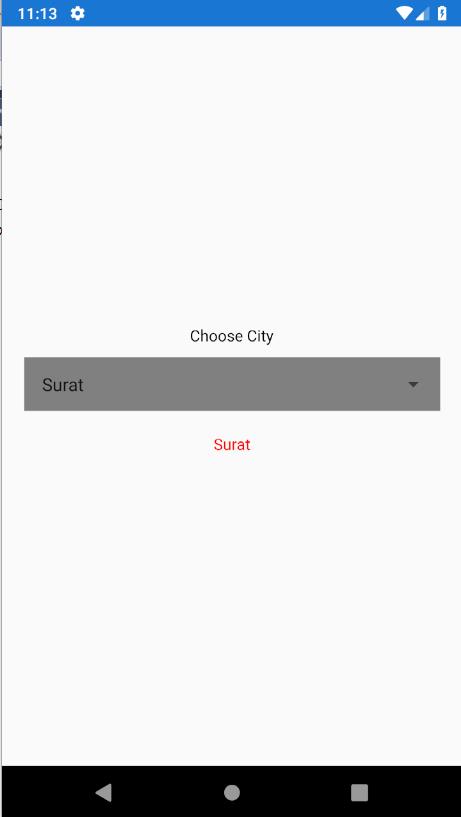
Fig: main page
Below code is a code-behind file here, we will add names of cities using a list and display selected city inside the label.
using System;
using System.Collections.Generic;
using Xamarin.Forms;
namespace DropdownControl
{
public partial class MainPage : ContentPage
{
List<string> City = new List<string>();
List<string> CityD = new List<string>();
bool IsItem1 = true;
public MainPage()
{
InitializeComponent();
City.Add(“Surat”);
City.Add(“Surendranagar”);
City.Add(“Rajkot”);
City.Add(“valsad”);
City.Add(“Morbi”);
dropdown.ItemSource = City;
dropdown.SelectedIndex = 0;
dropdown.SelectedItem += OnDropdownSelected;
}
private void OnDropdownSelected(object sender, ItemSelectedEventArgs e)
{
label.Text = IsItem1 ? City[e.SelectedIndex] : CityD[e.SelectedIndex];
}
}
}
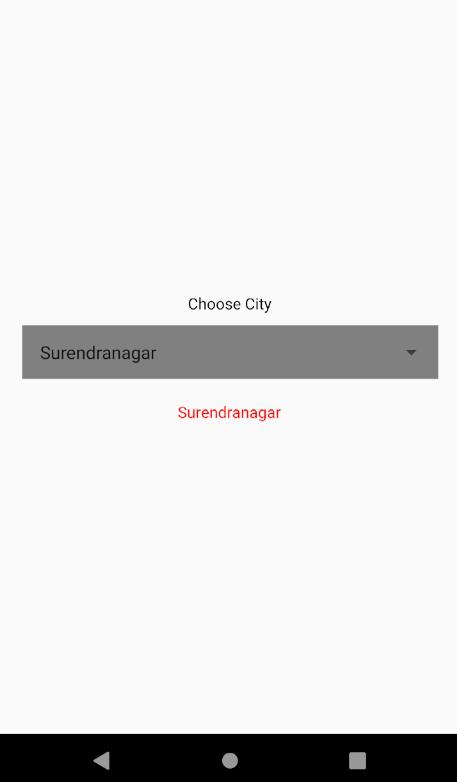
Fig: After selecting the city
Conclusion:
In this blog, we have learned about drop-down control in Xamarin.Forms. In Xamarin.Forms Picker control is used to display a list of items and we can select it. There is one control Spinner for the android platform that is used to represent the drop-down list in but for iOS, there is no control like spinner is available. Here we have seen an example of a Picker and drop-down in an Android project we have created a drop-down using spinner and custom renderer and display selected item.
Author Bio:
Ajay Patel – Technical Director, iFour Technolab Pvt. Ltd.
A Seasoned technocrat with years of experience building technical solutions for various industries using Microsoft technologies. With sharp understanding and technical acumen, have delivered hundreds of Web, Cloud, Desktop and Mobile solutions and is heading the technical department at Mobile Application Development Company – iFour Technolab Pvt. Ltd.